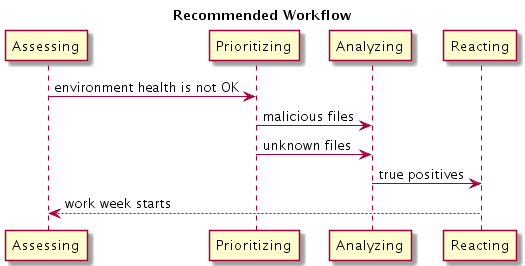
To make effective use of TIE capabilities, follow a scalable workflow. The ideal process periodically cycles a multi-stage funnel that prioritizes detailed analysis.
Activities:
TIE enables the following activities within ePolicy Orchestrator (ePO):
-
Assessing:
Out-of-the-box dashboards for TIE Server Files and TIE Server Certificates include new, changed, and suspicious files detected during the last week. You can use the dashboards to quickly assess the health of an environment. They provide useful entry points to the prioritization and analysis phases. You can drill-down in dashboard charts and tables into details of the aggregated data.
Dashboards → TIE Server Files
Dashboards → TIE Server Certificates
Dashboards → TIE Server Threat Intelligence
Dashboards → TIE Server ATD Submissions
Dashboards → TIE Server Infrastructure
Dashboards → TIE Server Overrides
Dashboards → TIE Server Data Cleanup
Dashboards → TIE Server Unsigned Unknown Files
Dashboards → TIE Server Signed Unknown Files
Dashboards → TIE Server Priority Unknowns Dashboard
You can also create custom dashboards using already available queries and quick-search widgets.
Dashboards → Dashboard Actions → New
-
Prioritizing:
The TIE Reputations page includes canned filters to prioritize analysis. They focus on Malicious or Unknown files.
TIE Reputations → File Search → Custom → Malicious Files
TIE Reputations → File Search → Custom → Unknown in GTI
You can create custom filters using the ePO query system. You can use data points such as reputation score and provider, and file attributes such as product or company name.
TIE Reputations → File Search → Custom → Add
-
Analyzing:
When an item is selected for further analysis, you can do two things. You can drill-down into the details about the Associated File Details tab, and obtain behavior insights on the Additional Information tab.
TIE provides valuable company-specific intelligence on local prevalence including Enterprise Count and First Contact.
The ePO Actions menu can pivot from a file to its parent, to its signing certificate, or to the list of hosts where the file is executed.
TIE Reputations → Select Item → Actions → Associated File Details
TIE Reputations → Select Item → Actions → File Parents
TIE Reputations → Select Item → Actions → Associated Certificate Details
TIE Reputations → Select Item → Actions → Where File has Run
-
Reacting:
There are several options to react to suspicious indicators:
- Manually setting overrides allows you to correct already running malware and to protect against future executions.
TIE Reputations → Select Item → Actions → File Most Likely Malicious or File Most Likely Trusted → Analyze Impact → Confirm Override
- Tag systems as compromised and use ePO queries to list them.
System Tree → Select Item → Actions → System Health Indicator → Set Possibly Compromised
Workflow:
The workflow cycle looks as follows:
Scaling:
To scale as the number of indicators grows, do the following:
- Use predefined comments to tag manual overrides to use custom filters to search for tags and split analysis into multiple incident responders.
- Use a custom query against system health indicators. The query pinpoints compromised systems, and enables remediation actions to be completed via a different and dedicated team.
Staging:
To add new base images to the managed environment with minimal disruptions, do the following:
- If your TIE is integrated with Advanced Threat Defense, manually run unknown binaries in a new or updated base image. This action forces sandbox analysis on them before wide distribution of the image.
- If there are binaries without a Global Threat Intelligence reputation in a new or updated image, run the GetClean or GetSusp tools so samples are scanned.
For details, see related article KB69385 - FAQs for GetSusp.
- Use the Import STIX wizard to check in new files. It allows you to evaluate local intelligence information such as reputations and prevalence on the hashes before the actual import.
TIE Reputations → File Overrides → Actions → STIX Import