


")


How to install and configure the Database Security Audit plug-in for PostgreSQL database for use with the Database Activity Monitoring Sensor
Technical Articles ID:
KB89299
Last Modified: 2023-08-09 04:39:10 Etc/GMT
Last Modified: 2023-08-09 04:39:10 Etc/GMT
Environment
Database Activity Monitoring (DAM) Sensor 4.x
Audit plug-in for PostgreSQL database 1.0.1-64 and later
PostgreSQL Database 14.x (64-bit), 13.x (64-bit), 12.x (64-bit), 11.x (64-bit), 10.x, 9.6.x, 9.5.x, 9.4.x — Open-source versions only
EDB Standard PostgreSQL Database 9.6, 9.5, 9.4 — Use the regular versions of the Database Security Audit plug-in.
IMPORTANT: Currently, the DAM audit plug-in is available only for versions 9.4, 9.5, and 9.6 of EDB Enterprise PostgreSQL.
Installing the plug-in on an Enterprise edition other than the versions listed above of the PostgreSQL DB fails.
NOTE: For up-to-date information about PostgreSQL Database supported versions, see the Database Security release notes.
EDB Enterprise PostgreSQL Database 9.6.2.7, 9.5.7.12, 9.4.2.11 — Use the Database Security Audit plug-in versions built for EDB for these versions of the database.
Technical Support expects that these plug-in versions work for the subsequent minor releases of each major version; for example, 9.4.2.12, 9.5.7.13, and 9.6.2.8.
Summary
This article describes the following:
Install and configure the Database Security PostgreSQL Audit plug-in Installation
When monitoring a PostgreSQL database, the Database Security Sensor requires the Database Security PostgreSQL Audit plug-in to be installed in addition to the Sensor:
The Sensor needs to connect to the database and issue commands to it in the following use cases:
NOTE: While defining an alternate user isn't a requirement, doing so is recommended to enable the function.
Create the user in the PostgreSQL database and perform some additional configuration so that the DAM Sensor can correctly connect to the database:
Troubleshooting
You can use the many log files created by PostgreSQL and the Sensor for troubleshooting. To verify that you've configured the plug-in correctly, view the filepgstartup.log .
This file is in the directory holding the data directory, for example,/var/lib/pgsql/9.5/pgstartup.log
Look for a line similar to the following:
Regarding the Sensor, if you specify an Alternative DBMS Connection, you can review the Sensor logs to verify that it can connect. If it can't connect, you can see some error messages.
- How to install and configure the Database Security Audit plug-in for the PostgreSQL database for use with the DAM Sensor.
- How to configure an alternate user in the DAM Server to enable the DAM Sensor to communicate with the PostgreSQL database.
- The general architecture of how the plug-in and DAM sensor work together to provide auditing of PostgreSQL.
Install and configure the Database Security PostgreSQL Audit plug-in Installation
- Download and install the plug-in. Follow the instructions provided in this Installation article.
- Configure the plug-in to communicate with the Sensor by setting the
json_socket option in the PostgreSQL configuration file (postgresql.conf ):
audit.json_socket = 1
For example:
audit.json_unix_socket = 1
audit.json_file = 0
NOTE: Don't set theaudit.json_file value to 1.
- Save the file and restart
PostgreSQL .
The Sensor needs to connect to the database and issue commands to it in the following use cases:
- To close a session
- To query the server version
- To receive a list of all open sessions
NOTE: While defining an alternate user isn't a requirement, doing so is recommended to enable the function.
- In the DAM Server, click the PostgreSQL database. You see the configuration page for the database open on the DBMS tab.
- Select Alternative DBMS Connection and enter the username and password you've chosen.
NOTE: In this example, we set both the username and password astrellix .
- Click Save.
- Download the
pgsql_create_user_mc.sql file using the link. This script is saved to your Downloads folder. - Edit this file and replace the following entries:
SENSOR_USER - Replace this value with the usernametrellix .
NOTE: Use the same username entered in the username field on the Alternative DBMS Connection page.
SENSOR_PWD - Replace this value with the passwordtrellix .
NOTE: Use the same password entered in the password field on the Alternate DBMS Connection page.
- Save the edited file.
- [OPTIONAL] By default, the script creates a database with the same name as the user. This database is needed if the template1 database is removed. If the template1 database exists, remove the statements that create a database. To remove these statements, comment out or remove the entries for these statements:
- Open the script in an editor.
- Remove the following lines:
CREATE USER SENSOR_USER WITH PASSWORD 'SENSOR_PWD';
CREATE DATABASE SENSOR_USER; -- OPTIONAL, if not defined, will use PostgreSQL 'template1' DB
ALTER USER SENSOR_USER WITH SUPERUSER
- Save the script.
Create the user in the PostgreSQL database and perform some additional configuration so that the DAM Sensor can correctly connect to the database:
- Open a command-line session and run the
pgsql_create_user_mc.sql file you created previously to create the user. - Enable the user/password connection for this user:
NOTE: The following example assumes that you're using PostgreSQL 9.5.x.
- Open the
pg_hba.conf file in the/var/lib/pgsql/9.5/data/ - Look for the following entries toward the bottom of the file and add lines such as the ones highlighted below:
# TYPE DATABASE USER ADDRESS METHOD
# "local" is for Unix domain socket connections only
local all <replace with username you created> password
…
…
# IPv4 local connections:
host all <replace with username you created> 127.0.0.1/32 password
For example, if you created the DB user called ‘trellix’, edit the pg_hba.conf file as shown below:
# TYPE DATABASE USER ADDRESS METHOD
# "local" is for Unix domain socket connections only
local all trellix password
…
…
# IPv4 local connections:
host all trellix 127.0.0.1/32 password
- Open the
- Save the file and restart PostgreSQL.
Troubleshooting
You can use the many log files created by PostgreSQL and the Sensor for troubleshooting. To verify that you've configured the plug-in correctly, view the file
This file is in the directory holding the data directory, for example,
Look for a line similar to the following:
- For plug-in version 1.0.11 and later:
< 2022-04-17 17:47:44.732 IDT >LOG: Trellix postgresql-audit extension initialized
- For plug-in version 1.0.10 and earlier:
< 2017-04-17 17:47:44.732 IDT >LOG: Intel Security postgresql-audit extension initialized
Regarding the Sensor, if you specify an Alternative DBMS Connection, you can review the Sensor logs to verify that it can connect. If it can't connect, you can see some error messages.
Related Information
Release download
Sensor Connections to PostgreSQL — Additional Information
The Sensor tries to connect to the database using several methods, from most to least preferable.
With traditional DBMS systems, such as Oracle or Sybase, the Database Monitor works by monitoring the database system memory and extracting SQL statements from network sessions.
WithPostgreSQL , DAM works differently.
To extract information about executing SQL queries, the DAM relies on information sent to it by the Database Security Audit plug-in for PostgreSQL. When the plug-in is installed in thePostgreSQL database and configured correctly, it sends messages in JSON format to the DAM sensor over a UNIX Domain socket.
The sensor receives these messages and extracts the needed information into its own data structures. It then processes the SQL statements and any information associated with each statement as it would from other DBMS systems.
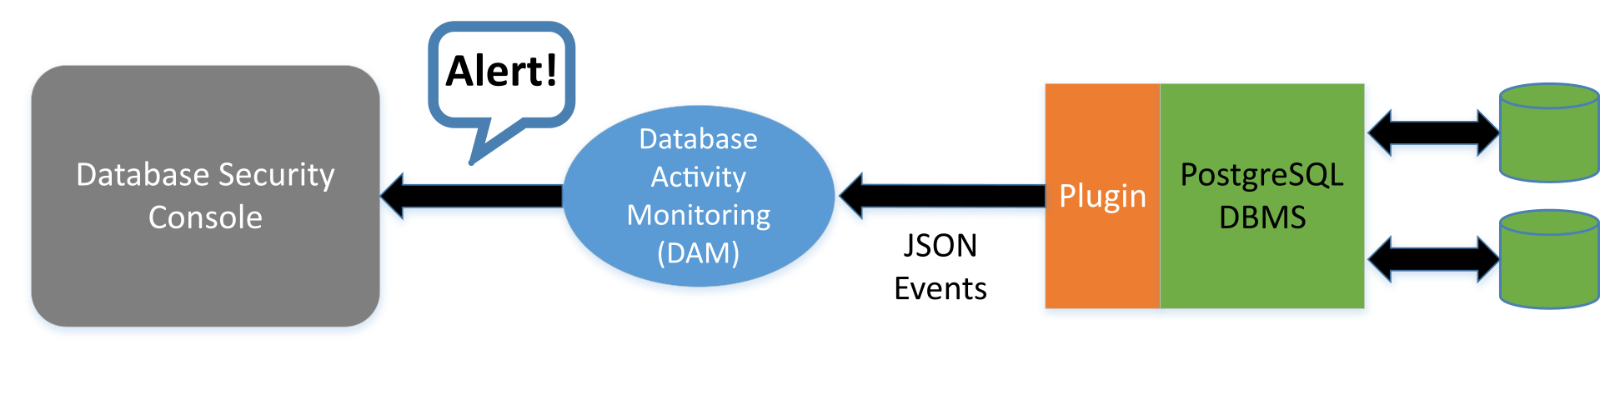
NOTE: The plug-in can log JSON to a file. But, this feature isn't used when the plug-in is being used together with the DAM sensor. Disable logging to a file.
Sensor Connections to PostgreSQL — Additional Information
The Sensor tries to connect to the database using several methods, from most to least preferable.
- The connection is made via username and password, as described previously. The user must be configured in the server and also in the
pg_hba.conf file.- The Sensor first tries to connect to a database with the same name as the user.
- If this fails, the Sensor uses the template1 database.
- Suppose that no username and password are configured in the Server. The Sensor tries to connect using the operating system username under which it's installed.
NOTE: Typically, this username ismfedbs . For this method to work, you must edit thepg_hba.conf andpg_ident.conf files as shown below.
- If the connection as the operating system user fails, the Sensor works connectionless; in this case, session termination isn't available.
- Open the
pg_hba.conf file in an editor. - Check that the following lines are present:
# TYPE DATABASE USER ADDRESS METHOD
# "local" is for Unix domain socket connections only
local all all peer NOTE: Identify this line is present, if not add it.
…
…
# IPv4 local connections:
host all all 127.0.0.1/32 ident NOTE: Identify this line is present, if not add it.
- Add the additional highlighted text:
# TYPE DATABASE USER ADDRESS METHOD
# "local" is for Unix domain socket connections only
local all all peer map=trellix NOTE: add the bolded map=mcafee entry.
…
…
# IPv4 local connections:
host all all 127.0.0.1/32 ident map=trellix NOTE: add the bolded map=mcafee entry.
- Save the file.
NOTE: We've used a map name oftrellix in this example, but you might use any name you choose.
- Edit the
pg_ident.conf file and add the following map entries:
# MAPNAME SYSTEM-USERNAME PG-USERNAME trellix postgres postgres trellix mfedbs postgres mfedbs postgres mfedbs NOTE: The final row can be omitted unless you see the error message below in your
PostgreSQL log:provided user name (postgres) and authenticated user (mfebds) do not match
- Log location:
/var/log/postgresql/postgresql-XX-main.log. XX denotes the current number of logs, the highest is presumed to be the latest
For example:
/var/log/postgresql/postgresql-11-main.log
- Save the file and restart
PostgreSQL .
With traditional DBMS systems, such as Oracle or Sybase, the Database Monitor works by monitoring the database system memory and extracting SQL statements from network sessions.
With
To extract information about executing SQL queries, the DAM relies on information sent to it by the Database Security Audit plug-in for PostgreSQL. When the plug-in is installed in the
The sensor receives these messages and extracts the needed information into its own data structures. It then processes the SQL statements and any information associated with each statement as it would from other DBMS systems.
NOTE: The plug-in can log JSON to a file. But, this feature isn't used when the plug-in is being used together with the DAM sensor. Disable logging to a file.
Affected Products
Languages:
This article is available in the following languages:
