As of May 14, 2024, Knowledge Base (KB) articles will only be published and updated in our new Trellix Thrive Knowledge space.
Log in to the Thrive Portal using your OKTA credentials and start searching the new space. Legacy KB IDs are indexed and you will be able to find them easily just by typing the legacy KB ID.
How to deploy Trellix products with Jamf Pro software
Technical Articles ID:
KB94262
Last Modified: 2022-11-18 03:49:23 Etc/GMT
Environment
Trellix Agent (TA) 5.7.7
McAfee Agent (MA) 5.7.6 and earlier Jamf Pro software
NOTE: MA was rebranded to TA in version 5.7.7.
Summary
IMPORTANT: We do not support this method, and provide it as is for informational purposes only. Use this method at your own risk. Technical Support cannot help with any issues that might arise from using it.
This article provides general advice about how to install Trellix software via Jamf Pro software for Mac.
Contents:
Click to expand the section you want to view.
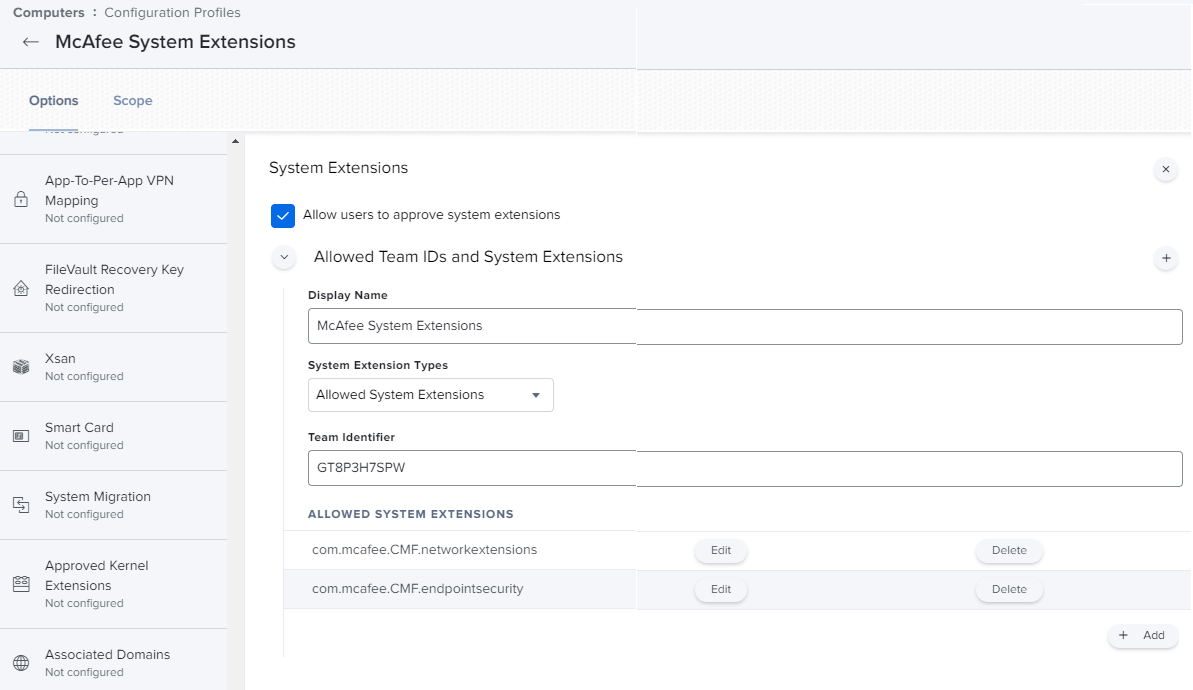
TA details:
McAfee Team Identifier: GT8P3H7SPW
Allowed system extensions, and Removable system extensions:
com.mcafee.CMF.networkextension
com.mcafee.CMF.endpointsecurity
Changes implemented for Monterrey Mac operating systems:
Create a '.pkg' file using Composer:
Open Composer.
Move the McAfeeSmartInstall.sh or install.sh package to Composer 'Sources'.
NOTES:
Make sure that you set the correct package permissions in Composer. For example, set "755" permissions on the package.
Different Jamfadministrators from different organizations might have different methods to manage macOS devices.
For any Jamfspecific policy or profile configuration, see Jamfsupport or documentation.
Create the package. For more information about creating packages, see the Jamf resources below:
For other operating system information about configuration profiles for Jamf and Mac, see the Trellix Community post:
Example:
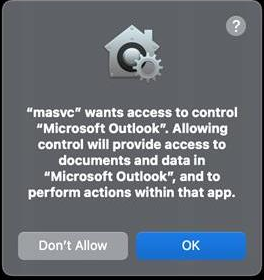
How to obtain the Code Requirement to add as an exclusion to the Jamf Configuration Profile for the Privacy Preferences Policy Control for the masvcprocess.
If you're presented with the following warning, perform the steps below:
NOTE: The process you want to exclude might change, and isn’t exclusive to the masvc process.
Reproduce the error or warning on the Mac. Write down the approximate time of reproduction up to when the warning or pop up occurs.
If you need to reinstall Trellix software, make sure to remove any PPPC / TCC entries using the command below in a terminal console:
# sudo tccutil reset All
To gather logs, run the command below from a terminal window:
sudo log collect --output /tmp --last 10m
NOTE: The file output from the above is found in /tmp/system_logs.logarchive
Open the /tmp/system_logs.archive file using the Mac Console app.
Navigate to the middle of the Console app, and change the Showing dropdown option from Last 5 Minutes to All Messages.
In the search field at the top-right corner, search for 'prompting for,' and press Enter. Then, you can see the metadata for the process.
Example metadata output:
default -0500 tccd Prompting for access to indirect object Microsoft Outlook by masvc
default -0500 tccd Prompting for access to indirect object System Events by masvc
Remove the filter from the search field in the top right of the Console app.
Scroll up through the previous log messages and find the file path that forced the prompt.
Example output:
info tccd REQUEST_MSG: msgID=15746.2, msg={ target_prompt=2 (0x2) target_platform_type=0 (0x0)
From the body of the message created in Step 6, find the Identifier and Code Requirement to add as an exclusion.
Example:
target_identifier="/Library/McAfee/agent/bin/masvc"
function="TCCAccessRequestIndirect"
preflight=false
timeout=120 (0x78)
target_path="file:///Library/McAfee/agent/bin/masvc" target_csreq={identifier masvc and anchor apple generic and certificate 1[field.1.2.840.113635.100.6.2.6] /* exists */ and certificate leaf[field.1.2.840.113635.100.6.1.13] /* exists */ and certificate leaf[subject.OU] = GT8P3H7SPW}
TCCD_MSG_ID="15746.2"
Add the appropriate exclusions.
Save the policy.
NOTE: The Jamf software or configuration might vary for each organization.
Open Jamf.
Navigate to Computers, Content Management, Configuration Profiles.
Search for the profile name to which you want to add to an exclusion, and click on the name.
Edit the profile.
Search for Privacy Preferences Policy Control.
In the lower-right corner, click Edit.
Look for the '+' option in the upper-right corner of the page, and click to add an entry.
Scroll down to the bottom of the page, where you see App Access with empty text boxes.
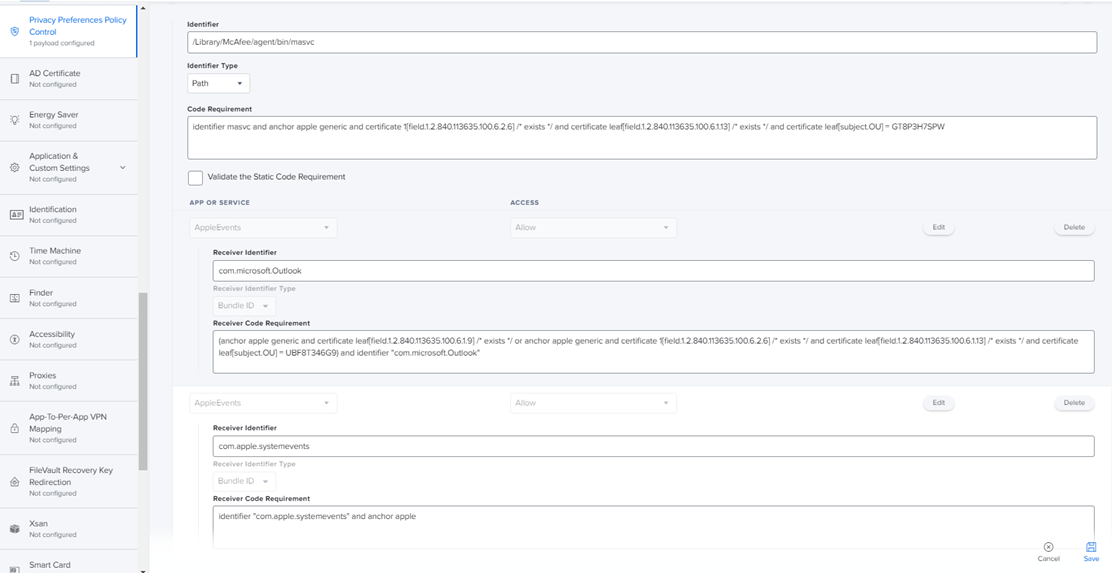
Add the following information:
Identifier: /Library/McAfee/agent/bin/masvc
Identifier Type: Path
Code Requirement: identifier masvc and anchor apple generic and certificate 1[field.1.2.840.113635.100.6.2.6] /* exists */ and certificate leaf[field.1.2.840.113635.100.6.1.13] /* exists */ and certificate leaf[subject.OU] = GT8P3H7SPW
Validate the Static Code Requirement: Don’t select this option.
To add an APP OR SERVICE, click '+' to add.
From the drop-down list, select AppleEvents, and Allow.
Add the following:
Receiver Identifier: com.microsoft.Outlook
Receiver Identifier Type: Bundle ID
Receiver Code Requirement:(anchor apple generic and certificate leaf[field.1.2.840.113635.100.6.1.9] /* exists */ or anchor apple generic and certificate 1[field.1.2.840.113635.100.6.2.6] /* exists */ and certificate leaf[field.1.2.840.113635.100.6.1.13] /* exists */ and certificate leaf[subject.OU] = UBF8T346G9) and identifier "com.microsoft.Outlook"
Click '+' to add.
From the drop-down list, select AppleEvents, and Allow.
Add the following:
Receiver Identifier: com.apple.systemevents
Receiver Identifier Type: Bundle ID
Receiver Code Requirement: Identifier "com.apple.systemevents" and anchor apple
Click '+' to add.
From the drop-down list, select SystemPolicyAllFiles, and Allow.
Click Save.
Click Save again at the lower-right corner of the page. You can see a dialog window that says 'Redistribution Options'. Select the needed options and click Save.


")