How to access ePolicy Orchestrator and Agent Handler Instances through a Bastion instance using PuTTY
Technical Articles ID:
KB90847
Last Modified: 2023-07-26 08:28:33 Etc/GMT
Environment
ePolicy Orchestrator (ePO) 5.10
Summary
Remote Access to ePO and Agent Handler (AH) Instances through Bastion Instance using PuTTY
Requirements:
- Download and install PuTTY from the PuTTY download page.
If you already have an older version of PuTTY installed, we recommend that you download the latest version. Make sure that you install the entire suite.
- You must have the following details about the Bastion Instance:
- Public IP address or DNS
- Private IP address of the ePO Application Server instance
- AH instance or DXL broker instance, which can be obtained from the respective Cloud Formation stack Outputs tab
- You need access to the AWS Key pair used during deployment. This key pair is needed to obtain the Password for the remote ePO or AH instances through the AWS console.
Solution
How to log on to the stack components:
- Run PuTTYgen.
- From the menu, click Conversation, Import Key.
- Click Save private key and save the PPK file to a secure location of your choice.
- Run the main PuTTY client.
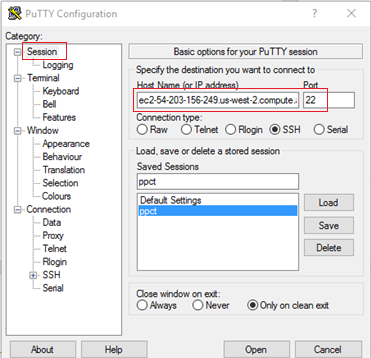
- In the Category pane on the left, select Sessions.
- From the Host name (or IP address) field, set the host name or IP address for bastion-server-dns.
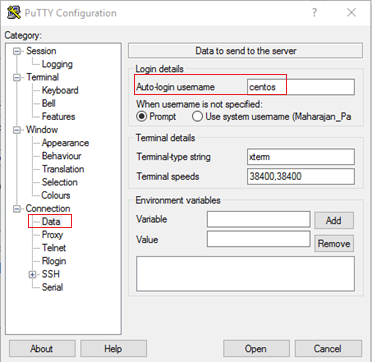
- In the Category pane on the left, expand Connection and select Data.
- On the Connection Data panel, set the Auto-login username to centos.
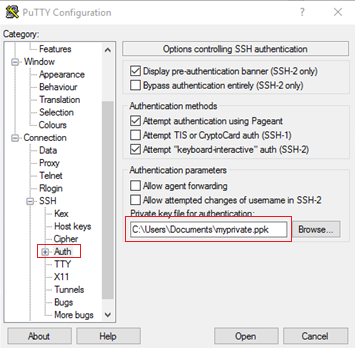
- In the Category pane, expand Connection, SSH and select Auth.
- On the Auth panel, set Private key file for authentication to the path where you saved the PPK file. Or, click Browse.
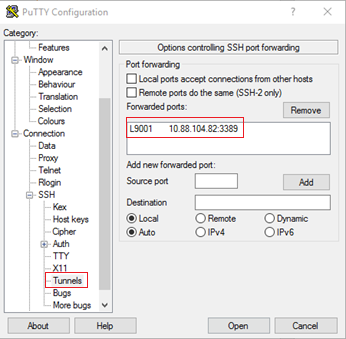
- In the Category pane, expand Connection, SSH and select Tunnels.
- On the Tunnels panel, choose a local port not in use for each host:port tunnel that you want to establish:
- Source port field—The localhost port to which you connect
- Destination field—The ePO server or Agent Handler Host IP address you connect to in hostname:port format.
NOTE: You can obtain the ePO Application Server instance and Agent Handler instance IP address from the respective stack Outputs or EC2 instance details.
- Click Add for each host that you want to be part of in your saved configuration.
NOTE: You can add multiple remote hosts like Agent Handler to establish the tunnel connection; then, save the session configuration.
- To save the connection parameters for future use:
- In the Category pane, select Sessions.
- On the Session panel, under Saved Sessions, type a name into the field.
- Click Save.
- When you're ready to continue, click Open at the bottom of the panel. A connection window opens to a non-interactive SSH session.
IMPORTANT: Leave the window open. You can minimize it to get it out of the way. But, don't close the window until you're ready to end your session.
- To verify if the tunnel has been established, view the Putty Event Log.
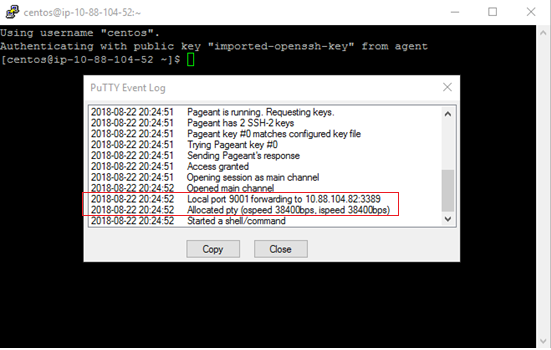
- If a tunnel has been established, save the configuration.
Access via a Windows Remote Desktop Protocol session:
- Open Windows Remote Desktop Connection to the host you specified in the Tunnels section above.
- Choose localhost for the "Computer" field and the tunneled port (example: localhost:9001).
- Specify the Username as administrator and when prompted, enter the password using the key pair (obtained from the AWS Console).
Access via Linux session
- Open a new PuTTY dialog box and configure a new secure shell connection to each host. For example, DXL broker instance, as specified in the Tunnels section above.
- On the Session panel, choose localhost for the "Host Name" field and the tunneled port (example: 9002).
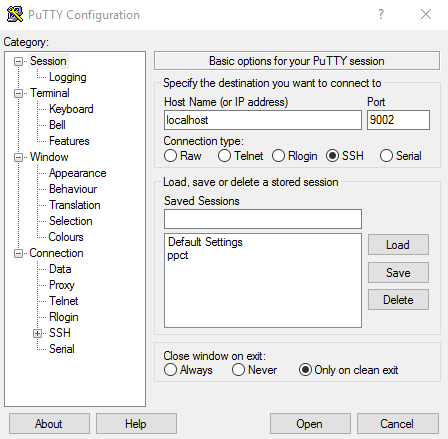
- In the Category pane, expand the Connection, Data panel.
- On the data panel, set the Auto-login username to centos.
- In the Category pane, expand Connection, SSH and select Auth.
- On the Auth panel, set Private key file for authentication to the path at which you saved the PPK file in the steps above. Or, click Browse.
|
 Loading...


